Clefs Tab
The Insert Clef pane is used for temporarily changing clefs on the staves in your score.
There are nineteen clef types available in NoteAbilityPro:
 | Treble clef |  | Alto clef |  | Tenor clef |  | Bass clef |
 | Treble Octava Up clef |  | Treble Octava Down clef |  | Bass Octava Down clef |  | Percussion clef |
 | No clef |  | Treble Double Octava Up clef |  | Bass Double Octava Down clef |  | French clef |
 | Baritone C clef |  | Mezzo C clef |  | Soprano C clef |  | Baritone F clef |
 | Basso F clef |  | Percussion clef (alternate) |  | Bass Octava Up Clef |
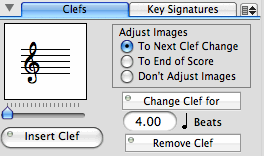
To insert a clef, place the Entry Cursor at the beat location where the new clef should begin. Choose the new clef to be inserted by adjusting the slider until the desired clef appears, then set whether images should be:
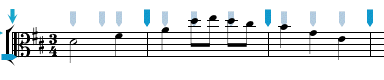
Click on the Insert Clef button. The clef will appear to the left of the Entry Cursor (and it may be adjusted later to avoid collisions with other images). If the Entry Cursor has been placed on the first beat of a measure, the clef will appear at the end of the previous measure. In the example below, the Entry Cursor was placed on beat 2 of the second measure and a treble clef was inserted, then the Entry Cursor was placed on beat 2 of the third measure and an alto clef was inserted.

To Remove a clef, place the Entry Cursor at the position that the clef was entered and click the Remove Clef button. If you are not sure what the beat position of the inserted clef is, select the clef and examine it in using the Image Info pane.
If you only want to change a clef for a short duration of your score, you can set the number of quarter note beats that the new clef is needed and click on the Change Clef button. This operation will insert the new clef at the Entry Cursor and then insert the original clef after the specified number of beats. This operation is useful if you are altering clefs after notes have already been added to the score. Here, only the notes between the two clefs will be changed to the correspond to the new clef. In the example below, a treble clef is needed only for the last beat of each measure. Place the Entry Cursor on beat 3 of the first measure, adjust the slider so that a treble clef is displayed, set the duration to 1.0 beats, and click on the Change Clef button. Repeat the same procedure on the next measure.


|
|
Key Signatures Tab
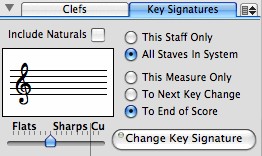
The Key Signatures tab view is used insert or change key signatures in your score.
In NoteAbilityPro, key signatures appear only at the beginning of measures, although not all staves in the system are required to have the same key signature.
To change the key signature, place the Entry Cursor in the measure where the key signature change will occur. Select the new key signature using the slider. Choose whether the new key signature will be added only on the staff that the Entry Cursor is on or on all staves in the system. Choose whether the keys signature will be added:
then click on the Change Key Signature button.
The other buttons on the Key Signatures pane allow you to hide or show the key signature or to hide the key signature on only one staff. In each case the Entry Cursor should be placed in the correct measure before the button is clicked
When new key signatures are added, a thin double barline is inserted. If desired, this barline can be altered using the Barline tab in the Barlines & Braces pane in the Score Structure panel.
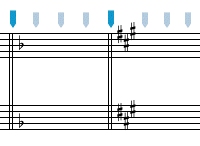
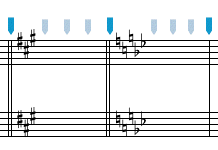
If the Use Naturals check box is selected, then the new key signature will include accidentals which cancel the previous key signature (as in the example below).
In addition to the standard flat and sharp key signatures, each score can have 2 custom key signatures which can include combinations of sharps and flats as well as quarter tones. These custom key signatures appear in the last 2 positions of the key signature slider. To create custom key signatures, use the Custom Key Signature Panel in the Tools menu.
|
 (The commands used to add the cautionary key signatures were "knb" and "kbb" for key-natural-B and key-Bb.) |
Menu items
The pull down menu located at the top-right corner of this pane contains items to Hide or Show key signatures in your score and to remove graphic clefs from the score.
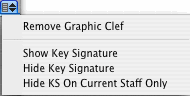
| Remove Graphic Clef | remove selected graphic clefs from the score. |
| Hide Key Signature | hide the key signature from the measure that the Entry Cursor is currently on. |
| Show Key Signature | show the key signature from the measure that the Entry Cursor is currently on. |
| Hide KS On Current Staff Only | Hide the key signature in the measure and staff that the Entry Cursor is currently on. |
The Remove Graphic Clef menu item can be used to remove clefs that have been added as graphic images. Graphic clefs are entered by using commands (eg !tc, !bc15 rather than by using the Insert Clef button on this panel).
The Hide Key Signature and Show Key Signature menu items are used for hiding or unhiding previously hidden key signatures. In both cases, the Entry Cursor must be placed in the measure that the key signature appears in. All existing key signatures in that measure will be hidden or shown. If you only want to hide the key signature on one staff, place the Entry Cursor on the desired staff and select the Hide K.S. On Current Staff Only menu item.
See also


© Keith A. Hamel 1998-2008 - All Rights Reserved |
 - If you try to insert a clef that is already the current clef on the staff, NoteAbilityPro
will give you a warning that the clef seems to be redundant.
- If you try to insert a clef that is already the current clef on the staff, NoteAbilityPro
will give you a warning that the clef seems to be redundant.