
OR
click on the small Tracks button located at the top-right corner area of the score:
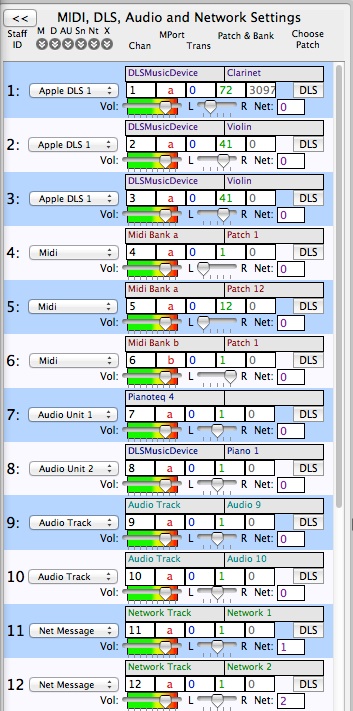
The main purpose of the Midi and Audio Track Setup panel is to specify the audio method used for playback on each staff of your score along with playback channel and/or bank, playback transposition, starting patch number, stereo position and track volume. All tracks in this panel are referenced to the corresponding staff ID (which is the number that appears at the right edge of each staff).
When you create a new score, the Audio method specified in the Sound/MIDI pane of the Preference panel is used for all staves in the score. You can open the Track Setup panel at any time in order to change the audio output method or to modify any of the other playback setting.
For each Staff ID, you can set the Midi/DLS channel that the notes on the staff will be sent to, the playback transpositon for that staff, the MIDI bank that the staff is associated with and the patch number that will be sent when that staff is played back. The MIDI bank is indicated by a letter "a" through "h", and corresponds to the MIDI out ports that have been set up in the MidiPorts panel - if desired each output port can be designated as a different MIDI bank. Each row also has a button which allows a DLS isntrument to be set from the panel that allows you to choose the from the available DLS instruments, and the instrument name is displayed.Choose the Playback Method
First you should choose which playback method you would like to use for each track (i.e. staff) of your score. Use the pull-down menu at the right of the panel to choose one of the following choices:| MIDI | play sounds on an external MIDI device (or through interapplication MIDI) |
| Apple DLS 1 - Apple DLS 6 | use one of the 6 Apple DLS Players (with Quicktime sounds or other installed sound banks) |
| Audio Unit 1 - Audio Unit 6 | use one of the 6 Audio Unit components as setup in the Audio Units panel |
| Audio Track | playback embedded audio files |
| Net Message | send messages through a network to a computer running MAX/MSP |
| Off | no playback will occur on that track |
If you want to change all tracks to a different playback method, click on the corresponding button above the column of pull-down menus.

Set Channels and Banks
For each track using MIDI, Quicktime, Apple DLS or Audio Units, set the playback channel. Some Audio Unit synthesizers will only support 1 channel, so in this case, keep your channel set to 1. All tracks set to the same channel and the same playback method will use the same sound for playback. However, if you are using a separate DLS Player (eg. Apple DLS 1 or Apple DLS 2), you can set each channel on each player to have a different instrument (patch).
For every MIDI track, you should set the bank number (a through h) which corresponds to the MIDI port configuration in your MIDI Ports panel. If you are using only one MIDI device, it will likely be set to bank a. Using banks allows you to send 16 channels of MIDI to each of up to 8 connected synthesizers. If you are not using MIDI for playback, the bank settings are ignored.

In the example above 3 MIDI devices are used on banks a, b, and c and since different MIDI device are used they can duplicate the channels being used (1, 2 and 3).
Set Playback transposition
The playback transposition is set in numbers of semitones (above the written note being positive and below being negative). The most common transpositions used by orchestral instrument are:
| 24 semitones | Up two Octaves |
| 12 semitones | Up one Octave |
| 5 semitones | Up a Perfect Fourth |
| 3 semitones | Up a Minor Third |
| 2semitones | Up a Major Second |
| -2 semitones | Down a Major Second |
| -3 semitones | Down a Minor Third |
| -5 semitones | Down a Perfect Fourth |
| -7 semitones | Down a Perfect Fifth |
| -12 semitones | Down one Octave |
| -14 semitones | Down a Major Ninth |
The playback transposition settings affect the pitch output for tracks using MIDI, Quicktime, Apple DLS, and Audio Units.
Set Patch Number
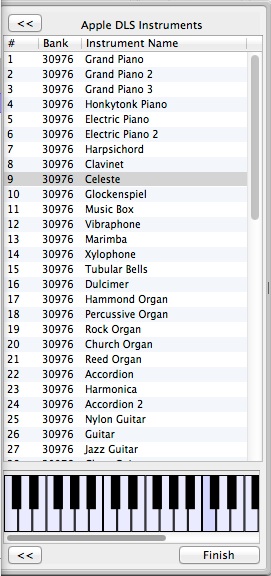
You can set the patch number to be used at the beginning of the score by entering the number in the Patch field and typing Return. The instrument name (if known) will appear in the DLS Patch Name field. If you do not know the patch number of the sound you want, click on the DLS button on each track. This brings up a panel which allows you to choose a DLS instrument and to hear the instrument by playing on the keyboard. The DLS button will display the instrument choices for the sound font currently set to that DLS Player (eg. Apple DLS 1).
Set Volume and Panning
The volume slider on each track can be used to adjust for different output levels that may occur from different audio methods you are using. Changes to the volume of a track have no effect while the score is playing back - you must stop the score before changing the track volume.

The stereo position sliders can be used to place tracks in various positions in stereo space. All sounds in that track will play in one of 5 stereo positions: Hard Left, Mid Left, Centre, Mid Right, and Hard Right.
Network Setup
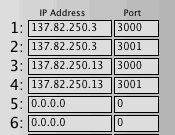
The small Network button at the top of the score displays a drawer which allows you to enter up to 16 IP address and ports for network connections. In the example below 2 IP address each with 2 ports have been setup. These addresses and ports are identified as numbers 1 through 4. Any tracks containing network messages which are set to use network IDs 1 through 4 will send messages to the remote machine at this address and port.
|
|
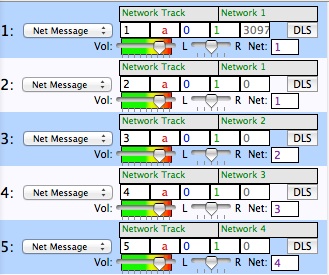
The following tracks are setup to send messages to each of the 4 address-port configurations. The first 2 staves will send messages to network configuration 1 while staves 2, 3 & 4 will send messages to network configurations 2, 3 & 4.
Below the network setup area is a table that allows you to load MaxMSP patches remotely.
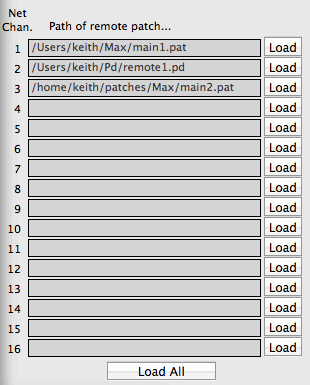
In order for the patch to be loaded, the application must be running on the remote computer and the appropriate loading patch should be open. For MaxMSP, the NAStarter patch (available as part of the UBC Max/MSP/Jitter Toolbox) can be used.
Percussion Map
The Percussion Map panel appears when you choose on the Percussion Map item from the Audio/Midi menu.
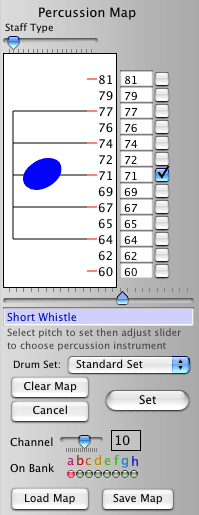
The purpose of the Percussion Map is to map the lines and spaces of the staff to specific percussion sounds. To do this, use the following steps:
The Clear Map button returns the panel to its default state, and the Cancel button closes the panel and makes no changes to your score.
The Load Map and Save Map buttons are used for saving and loading your percussion map setting on your harddrive. Percussion maps have the extension .npm.
See also


© Keith A. Hamel 1998-2005 - All Rights Reserved |
 - If you are sending network messages to your own computer you may use the name "localhost"
rather that the IP address of your network.
- If you are sending network messages to your own computer you may use the name "localhost"
rather that the IP address of your network.