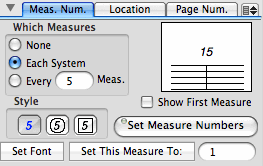
Measure Number Tab
To change the way that measure numbers appear in your score:
The display on the right side of this view shows the appearance of the measure number as the style or font is changed. The exact position of measure numbers relative to the staff, and which staves the measure numbers are drawn above or below is set in the location tab view of this pane. These two tab views work together to allow great flexibility in the positioning of measure numbers.
If you want a measure number to be displayed on the first measure of your score, check the Show First Measure box. (Normally, no measure number is displayed in measure 1.)
There are also buttons to exclude or include a measure in the measure number count, and a button to set the measure number of a particular measure. In each case, the Entry Cursor is placed in the measure you want to operate on. Excluding measures can be used if you have a pickup measure or if have created an unmeasured section in your score.
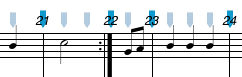
In the example below, a one beat pick up measure was created (using the Change Spine Only setting in the Time Signature pane). The Entry Cursor was placed in the first measure and the Exclude This Measure button was clicked followed by the Set Measure Numbers button.

Setting the number of a measure with the Set This Measure To: button is most often used when you are breaking a large score into multiple documents. In this case, you will want to set the first measure number of the new document to follow the last measure number of the previous document. Both the actual measure number in the document and the measure number appearing in the score are displayed in the Score Controls at the top of the score window.
|
|
Location Tab
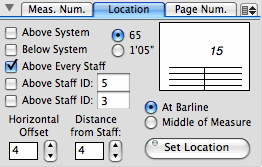
The Measure Numbers Location tab view is used to control the exact position of the measure numbers relative to the staves on the score.
This pane is used in conjunction with the Measure Number tab view to alter all aspects of the appearance of measure numbers.
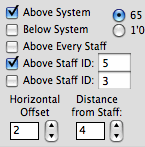
Measure numbers can be set to appear at the barline or in the middle of the measure. The distance (in ledger lines) above or below the staff can be set with the Distance From Staff slider and the horizontal offset (also in ledger lines) can be set with the Horizontal Offset slider. The Location check boxes allow you to specify which staves measure numbers will appear above or below. The five check boxes can be used in combination, and specific staff IDs can be entered in the last two check boxes. Once all settings have been made, click on the Set Meas Number Location button.
The settings shown above will result in the following measure numbers being created in the score.
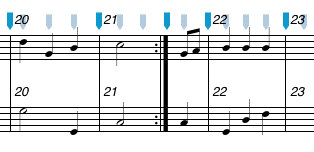
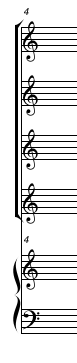
In the next example, measure numbers are set to appear above the system, and above staff ID 5. A smaller font is set (in the Measure Numbers pane), the Horizontal Offset is set to 2 and the Distance From Staff is set to 4.
The measure numbers will appear in the score as follows:
If you want to use timing (minutes and seconds) in your score instead of measure numbers, choose the radio button indicating 1'05" instead of 65. When this radio button is set, measure numbers are displayed as if they were minutes and seconds - measure 65 appears as 1'05', measure 300 appears as 5'00" and so on. When using this timings in your score, the assumption is that each measure is 1 second long (1/4 at mm=60 or 2/4 at mm=120). If this is not the case, you will have to explicitly set the measure numbers for each measure. Since timing scores usually start at 0 rather than 1, you will probably want to set the first measure number to 0. In the example below, a score has been set up with 1/4 meter with 15 measures on each system and no barlines, the first measure has been set to 0 and timing measure numbers have been choosen. As well, the first beat inset has been altered to 0 using the Format pane of the Preferences panel and small ticks have been added every 5 measures by placing the Entry Cursor in the desired measure and selecting the Tick Barlines On/Off from the Modify / Barlines menu. The result is:
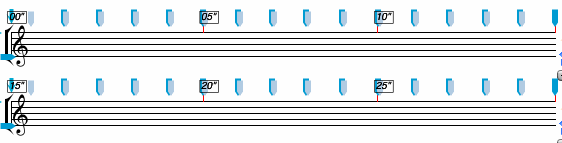
Notes (graphic or regular) can be freely placed on this score to create a graphic score with timing indications:

Page Numbers Tab
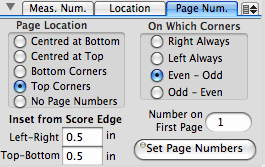
The Page Numbers pane is used to set the position and font of page numbers in your score.
To change the page numbers on your document:
You also have the option of hiding or un-hiding the page number on the current page by selecting on the Hide This Page Number or the Show This Page Number items in the small pull-down menu located in the top-right corner of this pane. These options are necessary if you want to omit the page number on the first page of your score. These operations can also be performed by using the Show/Hide Page Numbers item in the Modify / Page menu.
|
|
Menu items
The pull down menu located at the top-right corner of this pane contains items relating to measure and page numbers.
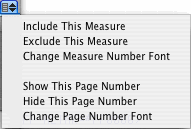
| Include This Measure | Include the measure that the Entry Cursor is currently on in the measure number count |
| Exclude This Measure | Exclude the measure that the Entry Cursor is currently on from the measure number count (it will have the same measure number as the previous measure) |
| Change Measure Number Font | Calls the Font panel so that a new font can be choosen for measure numbers |
| Show This Page Number | Show (the previously hidden) page number on the current page |
| Hide This Page Number | Hide the page number on the current page |
| Change Page Number Font | Calls the Font panel so that a new font can be choosen for page numbers |
See also


© Keith A. Hamel 1998-2005 - All Rights Reserved |
 - You should click on the Set Measure Numbers button after you have
clicked on the Exclude This Measure, Include This Measure or Set This Measure To: buttons
so that the measure numbers are rebuilt to reflect the changes.
- You should click on the Set Measure Numbers button after you have
clicked on the Exclude This Measure, Include This Measure or Set This Measure To: buttons
so that the measure numbers are rebuilt to reflect the changes.