|
MIDI Recorder
The Midi Recorder panel is shown by selecting Midi Recorder from the Operations Menu.

The MIDI Recorder is used for recording tracks from a MIDI keyboard (which should already be set up in the
Midi Settings panel) and transferring them to your score.
You can record up to 16 tracks, and can transfer the recorded material into any location in the score.
Each track can be transferred to a single staff, or the track can be split between two staves
(which need not be continguous). As well, you can specify which voice you want the track transferred to,
so it is possible to transfer more than one track to a single staff.
The Midi Recorder Panel is divided into four sections:
- The top left area of the panel contains the main recording and playback controls, tempo and metronome controls and buttons
to quantize recorded data and transfer the midi recording to the score.
- The top right area of the panel contains controls to the set the time signatures as well as settings for Midi file import and
playback device.
- The middle section of the panel contains the quantization settings which can be applied separately to any recorded track.
- The bottom area of the panel has a columns of buttons for each of the 16 Midi tracks and allows you to set which track you are
recording into, whether the track will playback, as well as buttons to clear the track and set the staff and voice that the track
will be transferred to the score.
Main Record and Playback Controls

These controls allow you to Record MIDI from your keyboard, Read Standard MIDI files (created by other music applications),
playback the original recording (or imported MIDI file), and playback the quantized recording (or imported MIDI file).
- The Record button will be highlighted during recording and a metronome will count off the number of measures you have indicated
as Pickup Beats. The notes recorded will be stored in the track (1 through 16) highlighted as the Record track in the Track area at the bottom of the
panel.
- The Read Midi File button brings up a panel where you can choose a midi file to import into the Midi Recorder. Once the file
has been read, each track of the Midi file will be loaded into a separate track as if you have recorde each track separately. The tracks can be quantized
and auditioned before they are transferred to the score.
- The Play Midi Score button plays the original recording along with a click track.
- The Play Quantized Score button plays the quantized recording along with a click track.
|
 - In order to import Standard MIDI Files, they must be placed in your Documents directory and they
must have an extension of ".mid" or ".midi". Only type 1 Standard MIDI files will be imported. - In order to import Standard MIDI Files, they must be placed in your Documents directory and they
must have an extension of ".mid" or ".midi". Only type 1 Standard MIDI files will be imported.
|
Above these controls are settings for the number of pickup measures before the recording occurs, the tempo you are recording at, a
metronome check box to turn the metronome on or off and a measure and beat display so you can see the beat and measure during recording
and playback.
Below these controls is a button to quantize the recording, a button to Transfer the quantized recording to the score, and text boxes to set the location in the score
(measure number and beat position) you would like the quantized recording to appear in the score.
|
- Quantization refers to the process or adjusting the rhythm and durations of a live performance
to create a more metrically accurate version of the music.
- In NAPro, you can transfer multiple Midi Recordings to different locations in your score rather than having to record a long Midi
sequence and transfer it all at once.
|
Time Signature and Import Settings
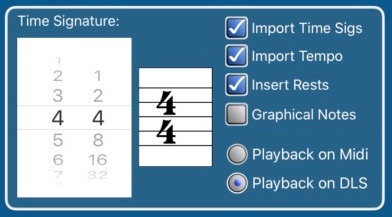
The top-right area of the panel allows you to set the time signature for the recording (and for the click track), to set whether you want playback to occur through a connected MIDI
device or using the built-in DLS synthesizer, and check boxes to control whether time signatures and tempi are imported with the Midi files and whether rests should be inserted into the
score when the recording or MIDI file is transferred.
There is also a checkbox - Graphical Notes which give you the option of transferring the MIDI recording as un-quantized graphical notes. This option is used very rarely and
only in situations where you do not want the recorded notes to be part of a metered score.
|
- When Time Signatures and Tempo markings are imported as part of a Standard MIDI File, they will be transferred into the score as new Time Signatures and
as Tempo Text and the corresponding tempo changes will be inserted into the score.
|
Quantization settings
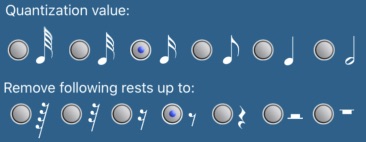
The first row of duration values in the Quantizations settings control the minimum note duration that all recorded notes will be adjust to. For example, if you set your
quantization value to an eighth note, all notes will be adjusted so they begin and end on the closest eighth note to their recorded position. The second row of rest values, controls
the spaces between the end of one note and the beginning of the next. Notes will be extended to fill up the space indicated by this setting. For example, if you have entered a note that is about
less than an eighth note in duration and have the Remove Rests set to a quarter note, the eighth note will be extended to be a quarter note. Generally, the Remove Rests setting
is larger than the Quantization value. After some experimentation with these values, you will get a feel for which values work best for you.
|
- Often is it better to record notes in a more detached (staccato) manner and to use a larger Remove Rests value to fill in the rests between notes.
This avoids the problem of having overlapping notes, if the previous midi note happens to still be down when the next key is depressed.
|
Track Controls

The area at the bottom of the panel contains controls for each of the 16 recording tracks and a play control for the click track. The following controls are available:
- Record Track button - allows you to select which of the 16 tracks you are going to record into. When you record into a track the previous recording in that track is replaced by the new recording.
- Play Track button - allows you to select which of the 16 tracks (and the click track) will playback when the Play Midi Score or Play Quantized Score buttons are touched.
- Clear Track button - clears the recorded data from the track.
- Quantize Radio button - allows you to set whether the track will be quantized after the next recording or when the Re-Quantize MIDI button is touched.
- Score Staff settings - allow you to specify which staff or staves you want the track transferred to in the score. If the second staff is not 0, then the split point (eg. C3) sets
the pitch below which notes will appear on the 2nd staff. Middle C is C3.
- Stem Direction button - allows you to set the voice you want the music transferred to - stems going both directions, stems up or stems down.
Midi Recording Steps
The procedure for recording tracks of MIDI and transferring them to your score is as follows:
- Set the metronome speed and the time signature for the recording click track
- Set the number of measures of pickup you want (this is the number of measures counted out before the recording starts)
- Set the sound playback device you want to use - MIDI or DLS.
- Select the track you want to record on by highlighting the record button for that track.
- Touch the Record button in the Record and Playback controls and begin playing on your MIDI keyboard.
- Touch the Record button to stop recording once you are finished playing.
- Quantize the performance by setting the appropriate quantization values and touching the
Re-quantize Midi button.
- Listen to the quantized score by touching the
Play Quantize button. If the quantized performance does not sound correct, adjust the quantization settings and click on the
Re-quantize MIDI button again.
- Continue recording other tracks, if desired, by choosing the record button on a different track.
- Once you are finished recording and satisfied with the accuracy of the quantized score, set the staves and voices to which each recorded track should be transferred.
- Set the measure number and beat position in the score that you want your recording transferred to.
- Touch the Transfer to Score.
Touch the Done button at the top of the panel to dismiss this panel. Both the recorded and quantized scores will be saved and available next time you display with panel. If you have
to leave the panel to create a new score, your recording will still be available once you return to the panel and you can transfer your recording to the new score.
|