|
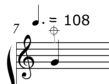
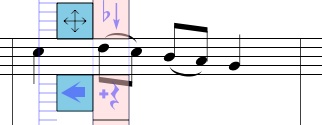
To Enter notes and other music images onto your score, you must first ensure that the Activity Mode is set to Insert Mode - the target Icon on the Tools Palette must be highlighted.  Select the category of Images you want to enter from the Tools Palette, and then select the specific image you want from the Variable Image Palette. Notes can be entered onto the score either by touching the screen and dragging the note into position or by using the piano keyboard which appears when you click on the keyboard icon on the Main Toolbar.  Other images such as dynamic markings, rests and graphics must be placed on the score by touching the screen and dragging the image into position. Text is entered onto the score by touching the screen and typing the text. Regular notes and rests will appear at the score position indicated by the Entry Cursor. Other images will appear close to where you touch the screen - normally images appear slightly above the position you touch the screen. Entering Notes  To enter notes, highlight the Note Button on the Tools Palette. Step 1 - Make sure the Entry Cursor is at the beat position and on the staff you want the note to be entered onto. If the Entry Cursor is not in the correct position, you should drag it by touching the blue drag area on the Entry Cursor and moving the Entry Cursor (once it is highlighted) to the correct staff and beat position.  Or, you can just touch a staff on another system and the Entry Cursor will move to that location where it can be dragged to the beat position you want to enter notes at. Alternatively, you can use the Shift Score Position buttons on the Tools palette to shift the Entry Cursor forward and backward in the score.  Step 2 - Select the note type you want to enter using the note buttons in the Variable Image palette:  The dot and double dot buttons can be used to extend the note value with a single or double dot. The triplet, quintuplet and variable tuplet buttons will cause that tuplet value to be entered. To choose a different tuplet value, choose the variable tuplet button (?) and click on the #:# button and choose the tuplet you want from the panel that appears. The current value of the variable tuplet will be displayed to the right of the variable tuplet button.   For those users who are familiar with the desktop version of NAPro, the top left corner of the screen shows the current command. In situations where you have a very complex tied group, you can always enter the command into the command box as text. The command for the above sequence of buttons is "h.e" Step 3 - Enter the note either by touching the score near the Entry Cursor and dragging the note to the correct pitch or by clicking on the desired pitch on the keyboard. 
Once a note has been entered it can be shifted up and down (if needed) using the green Shift Up or Shift Down buttons  and it can be lowered or raised by a chromatic semitone using the buttons on the right side of the Entry Cursor. 
Entering Rests  Rests are entered by highlighting the Rest button on the Tools Palette and choosing the rest type from the Variable Image Palette.  To enter a rest, touch the screen near the Entry Cursor. By default, rests will be placed at the horizontal position of the Entry Cursor and vertically at the rest's default position on the staff. If you hold your finger down while entring a rest, you can adjust its vertical position on the staff. As a shortcut, you can enter a rest with the same duration as the current note but touching the Add Rest button on the Entry Cursor or by touching the Add Rest button on the keyboard panel.   Entering Dynamics  Dynamics, crescendo and decrescendo marks are entered by highlighting the Dynamics button on the Tools Palette and choosing the dynamic type from the Variable Image Palette. 
Select the dynamic you want to enter onto the score and touch the score near where you want the dynamic mark to appear. It will be placed at a fixed position below the staff and you can drag it left or right before releasing it. If you want to move the dynamic marking away from its default location you can use the Shift Up and Shift Down arrow keys or move to Edit mode, select it and drag it.
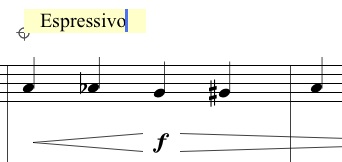
To create crescendo or decrescendo marks, select either the Crescendo button or the Decrescendo button and drag your finger from left to right to create a crescendo to create the image. All dynamics will be placed at a fixed position below the staff. The example below shows two dynamic markings and a crescendo between them. 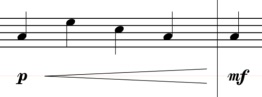 It is also possible to link dynamics and crescendo or decrescendo symbols and draw them with one gesture. In order to do this, select the first dynamic value, then touch the link button, then the crescendo or decrescendo symbol, then the final dynamic value. Touch the Clear button to remove selected buttons. In the example below, the following sequence of buttons was selected:
When you drag your finger from left to right, the following graphic will appear:  Since all these images are independent objects, you can adjust their locations individually: 
Entering Score Graphics  Graphical trills, arpeggios, octave signs, lines, rectangles, ovals, curves, slurs and tuplet brackets are entered by highlighting the Graphics button on the Tools Palette and choosing the graphic image you want to add from the Variable Image Palette. Other than the Lines, Rectangles, Ovals and Freehand graphics, there are alternative versions of these objects that either appear during note entry (tuplet markings), can create by adding symbols to notes (trills) through editing operations (slurs) or through the buttons on the Score Graphics Panel (arpeggios, octava signs, Multi-measure rests).
 For trills, octava lines, octava basso lines, multi-measure rests and tuplet brackets, you should draw the image by dragging from right to left on your score. 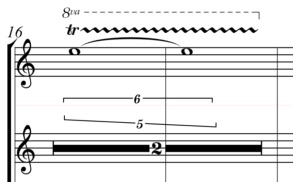 For the number to appear in the bracket (6 and 5 in the above example) touch the # button and select a number before adding the image. Most of these objects can be entered in other ways and form part of the musical structure. For lines, rectangles, and ovals, you can drag your finger in any direction to create a line in any direction or a rectangle or oval of any size. Many different line types and colours are possible in NoteAbilityPro and these can be set using the Graphics Panel from the Edit Toolbar. The example below shows some simple graphics added to the score. 
While graphical slurs and curves are rarely needed, they can be used when you just want a slur that isn't connected to any notes. To draw graphical slurs or curves, you need to drag your finger, then tap at the mid-point and drag to the end point. In the example below these images are not connected to any notes but just freely drawn in the score.  There are two buttons that can be used for drawing freehand graphics - the first draws straight line segments and second draws curved line segments.  After selecting one of these buttons, drag your finger on the screen to make a freehand graphic image and release your finger to complete the image. You should restrict your graphic image should to being drawn within the staves of one system, and while the image can cross measures, it cannot cross from one system to another. Once your freehand graphic image has been added to the score you can use the Freehand Graphic Panel to adjust the line width, change the line colour, add arrows, or turn the freehand graphic into a closed graphic that can be filled. Below are some examples of freehand graphic images: 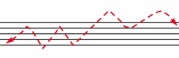 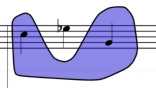
The last two buttons in the Graphics Palette bring up panels with a wide variety of music images that can be added to your score if needed. Most of these images are added to your score in other ways: symbols and accidentals are normally attached to notes, clefs and barlines are created through changes to the score using the Score Structure Panel. However, there are occasionally times when you simply want a graphical version of a musical image and these panels can be used for those situations. For example, you might want an accidental that is not attached to any note, a fermata placed over a barline, a laisser vibrer (lv) symbol that is placed at the end of a system, a cautionary clef in a cut-out score, or a series of upbow and downbow markings above a long held note. Since these images a free-standing graphics that are not connected to any other images and have no affect on playback, you should only use them wwhen you simply need a graphical version of a music image in your score. The first of these panels contains symbols and articulation marks: 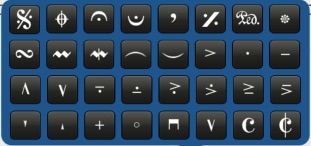 The second of these panels contains accidentals, barlines and clefs: 
Below is an example of a contemporary score using some of these graphical images:  Entering Text  Text is entered by highlighting the Text button on the Tools Palette and choosing the text type from the Variable Image Palette.  There are 5 different types of text that can be entered on your score.
The process for entering Measure Text and Page Text is:
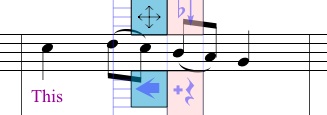
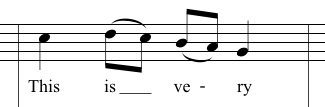
Entering Lyrics Lyrics should be added after the notes have been entered. The process for entering Lyrics is:
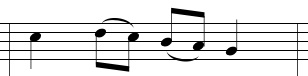
Entering Graphical and Grace Notes  Grace notes and graphical notes are entered by highlighting the Gracenote button on the Tools Palette and choosing the grace note, graphical note or early music note from the Variable Image Palette.  Graphical notes are full sized notes that can be freely positioned and moved in the score. They are commonly used for contemporary music or in situations where you don't want your notes aligned to the rhythmic spine. Grace notes are small notes that are positioned in front of regular notes. Like graphical notes, grace notes can be moved freely in the score. Early Music notes are like regular notes (i.e. they are affixed to the rhythmic spine) but their appearance has been altered. There are three options for grace notes which determine whether there is one, two or three beams or flags in the figure. Grace notes are simply placed on the score in front of an existing note. They will initially appear to the left of your finger and you can move your finger to drag them into place. More than one grace note can be placed on the score, and they can be beamed together using the Beam notes button. As well, the grace notes and the following note can be selected and a slur formed using the Slur Notes button. Below we can see the stages of entering grace notes in the score: 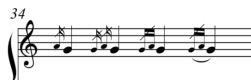 Complex groupings of grace notes are possible and they can be added to the score even if they are not attached to any other notes.  Graphical Notes Graphical notes are class of notes that are not aligned to the rhythmic spine and can be freely moved around the score. For most scores these are not needed, but for scores of contemporary music or for music that has un-metered sections these notes can be used. To add a graphical notes to your score, choose the note type you want and touch the screen to add the note. The notes will be place in the score to the left of your finger and can be dragged into place. Since these notes are not affixed to the Entry Cursor, it doesn't matter what staff the Entry Cursor is on, you can add these notes anywhere on the page. The example below shows regular notes in the lower voice and graphical notes in the upper voice:  Once these notes have been entered, they can moved, beamed, slurred or altered as if they were regular notes - in fact they can be beamed to regular notes. They will playback at their exact fractional beat location in the measure. 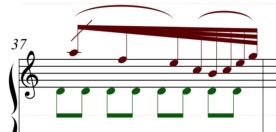
Early Music Notes A collection of Early Music notes is available in NoteAbilityPro. To use these notes, select the note type and enter the notes as if they were regular notes - they can be entered by touching the screen or using the Keyboard. If needed, you can also create graphical versions of these notes using the Commands: "&nq", "&ne" etc. 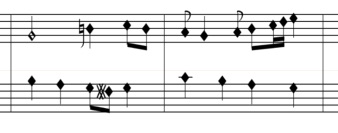 | |||||||||||
|
See also | |||||||||||
|
© Keith A. Hamel 2013-2020 - All Rights Reserved | |||||||||||
 - the black notes on the keyboard can be used to enter both the flat and sharp values of that key. The lower half of the key
enters a sharp (eg. F#) while the top half of the key enters a flat (eg. Gb).
- the black notes on the keyboard can be used to enter both the flat and sharp values of that key. The lower half of the key
enters a sharp (eg. F#) while the top half of the key enters a flat (eg. Gb).