
Below are the modifications, enhancements and bug fixes for all versions beginning with NoteAbilityPro version 2.100
Version 2.103
Version 2.104
Version 2.105
Version 2.106
Version 2.107
Version 2.108
Version 2.302
Version 2.319
Version 2.320
Version 2.323
Version 2.338

Version 2.346
Version 2.365
 ON:
ON:
Version 2.370
Recorded files should sound identical to the score playback since all attributes of the performances (volumes, tempo, patch changes, embedded soundfiles etc.) will be captured in the recording. If you want to burn your recording onto an audio CD, use the Record To Disk menu and select any one of the file formats. Once the recording has completed, drag the file into a new playlist in ITunes, click on the Burn Disc button, and insert a blank disc.
On some computers, when recording a particularly complex score you might experience short dropouts in the recording. If this occurs, try quitting any other running applications and changing your preferences so that the score does not scroll from page to page during playback.
Version 2.373
Version 2.396
Version 2.396
Version 2.406
Version 2.413
Version 2.417
Version 2.423
Version 2.425
Version 2.426
Version 2.428
Version 2.430
Version 2.432
Version 2.433


Version 2.436
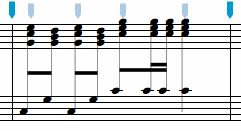
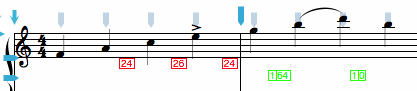
MIDI Controller messages involve two components - a controller number and a value. Some MIDI controller numbers default to Volume (7) Panning (10) Sustain Pedal (64) while others are dependent on the receiving synthesizer or sampler. Controller messages can be used in some Software Samplers (such as the Vienna Symphonic Library) to switch between instruments on a single channel. In some cases you may want to include controller messages for other purposes (eg to alter the panning position of the playback). To enter a Controller Message in use the command: ] followed by the controller number, a dash, and the controller value. For example, ]1-64 will set controller number 1 to 64, ]10-80 will set controller 10 to 80. MIDI Controller messages appear in green below the staff and will be sent to the instrument at its location in the score. In the example below, values of 64 then 0 are sent to controller number 1.
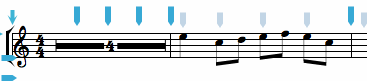
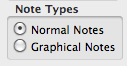
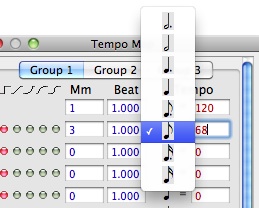
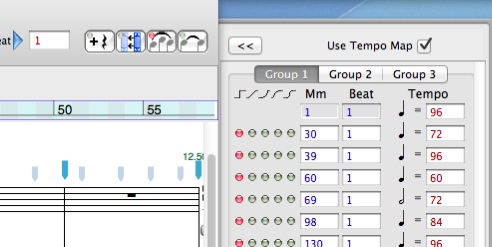
Graphical Score Midi Import was added to the Midi Recorder. In order to transfer notes with the precise original score location and durations, selected the Graphical Notes radio button in the Note Types area of the Midi Recorder:
Version 2.437
Version 2.438
Version 2.439
 ->
-> 

Version 2.445
Version 2.446
Version 2.452

Version 2.455
Version 2.456
Version 2.462
Version 2.470
Version 2.474
Version 2.475
Version 2.477
Version 2.480
Version 2.485
Version 2.490

Version 2.507
Version 2.509
Version 2.514
Version 2.518
Version 2.520

These colors do not appear when the document is printed. This feature help remind users when they are using alternate voices so they can return to voice 1 after entering multi-voice passages.

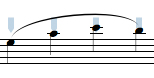
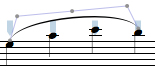
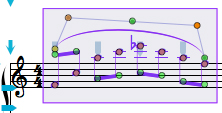
The input method for this slur requires 5 control points to be entered and they should be entered from left to right on the page. These points represent the starting point, the top or bottom point of the first part of the slur, the mid point of the slur (at which the slur shift to the other vertical direction), the mid point of the second part of the slur and the end of the slur. While the slur is being entered, straight lines show the sequence of lines:
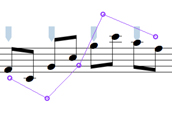
Once all 5 points have been entered, the slur will appear:
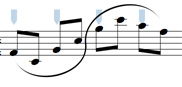
Any of the 5 control points can be altered by selecting them and dragging them to change the shape of the slur. These slurs are purely graphical so they will not divide across systems the way slurs that are added using the Add Slur button are.
Version 2.529
Version 2.535
If the following music is selected:

It will appear in the Velocity Editor as:

(N.B. Selections can include several staves if desired and as much of the score as you want to edit at one time.)
You can see that by default all the velocities are set to 64. Using the pencil tool, you can freely draw across the velocity values to change them or click on individual velocity values to change them. The minimum velocity value allowed is 5 and the maximum is 127. The line tool allows you to create linear changes to the velocities and the curve tool allows you to create curved increases or decreases in the velocities. The curve direction depends on the direction you draw the curve (right to left or left to right).
The four other buttons on the left side of the panel allow you to modify all selected velocities. Normally all velocities are selected, but if you only want some of the notes altered, you can use the selection tool (rectangle) to select a group of notes before engaging these buttons These buttons will increase, decrease, expand and compress the selected velocities.
If you want to hear the new velocities click on the play button. If you want to revert to the original velocities, click on the Revert button. The zoom arrow buttons at the bottom of the panel increase or decrease the horizontal zoom in the window.
Once you are content with the changes you have made, click on the Apply Changes button. If you do not click on this button, the changes will not be made to the score.
The example below shows how the curve tool is used to create a velocity fade out:


Version 2.536

The control points of the Freehand graphics objects are shown below -- each of these control points can be altered.
Two menu items were added to the Graphics Pane pull-down menu so that you can close a selected freehand graphic image (i.e. join the beginning and ending points) and set them to be filled with the current fill color.
Version 2.538
Version 2.540
See also


© Keith A. Hamel 1998-2005 - All Rights Reserved |